To set up my computer, I had to first install ArduinoIDE and ArduinoBLE since I had neither.
In addition, I had to install all associated drivers for Arduino including on specifically to support Windows.
Prior to installing that additional driver my computer would frequently crash when connected to the Artemis Nano.
I already had python, pip, and venv installed. So I just had to initialize the new environment and install the required packages.
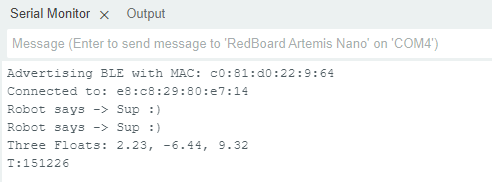
Then I downloaded the code and started the jupyter server via cmd line. After downloading I got the MAC Address: 'c0:81:d0:22:9:64' and generated a new uuid and set these in connections.yaml and ran through the demo.ipynb notebook to verify everything was working.
Example Tasks
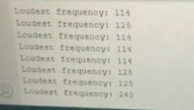
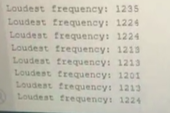
When everything was set up, I ran the four examples and got the following results:For blink I saw the blue light flash repeatedly. How it looks can be seen under lab tasks where I linked a video responding to the C note.For the next task "Apollo3 - Serial" was printed followed by "printf supports printing formatted strings! count: n" (where n was 0 adding up until 9). After 9 was reached it lastly printed out "Echo... (type characters into the Serial Monitor to see them echo back)"For temperature, it read 76 Fahrenheit and after rubbing the temperature sensor for a while it went up to the low 80s (~82) and after stopping it went back down to 76.mic_output had the frequency output change from 100-150 to 1200-1250 when whistling at it. Images of below and after are included below.
Codebase
There's two sets of code. One is the Arduino code in C which is uploaded to the Artemis Nano and the other is python code which we use on the computer.
The demo.ipynb file provides member functions which are used to communicate via ble.member_function(member_function_parameters).
One of the most import commands in the python code is the .send_command which takes in the cmd_type (declared in cmd_types.py) and matches them with cases in the C code on the Artemis.
This command is used to send information to the Artemis from the computer and to receive it you can use receive_[type](uuid) as defined in demo.ipynb
or you can set up a notification handlers so you receive calls back when you send commands to the Artemis.
A brief rundown of other things to note: UUIDS are identifiers for types of data you want to send.
Services are used to set/add uuids, names, services, and characteristics. Characteristics are
ways to handle different types of data and generally correspond with standard types such as floats and strings.
EStrings are used to send data back from the Arduino to the python code. enum CommandTypes define the commands that can be called.
Lab Tasks
The first non-example task I had to do was get the LED to blink when I played the musical "C" note over the speaker,
I found the frequency of "C" to be 1041 and then made an if statement that would then blink
if C was called.
First 3 Tasks
The first three tasks in Lab1 B involved sending values to the Artemis Board (and in the case of GET_TIME_MILLIS) it replies with a string to the string characteristic.
My code output the values in the Serial Monitor and receives it back to the computer which can be seen below.
Notification Handler and 3 Ways to Get Data
After that I needed to receive the string characteristic from GET_TIME_MILLIS by setting up a notification handler.
Then I wrote a loop to get the current time and over the course of 6 seconds the time tracked went from 2947 to 3076.
Which tracks to 21.5 messages being output a second. Each message is 6 bytes so roughly 129 bytes/second.
The general setup of the notification handler is shown below along with an output.
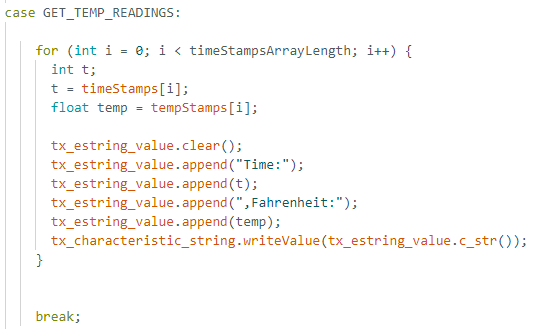
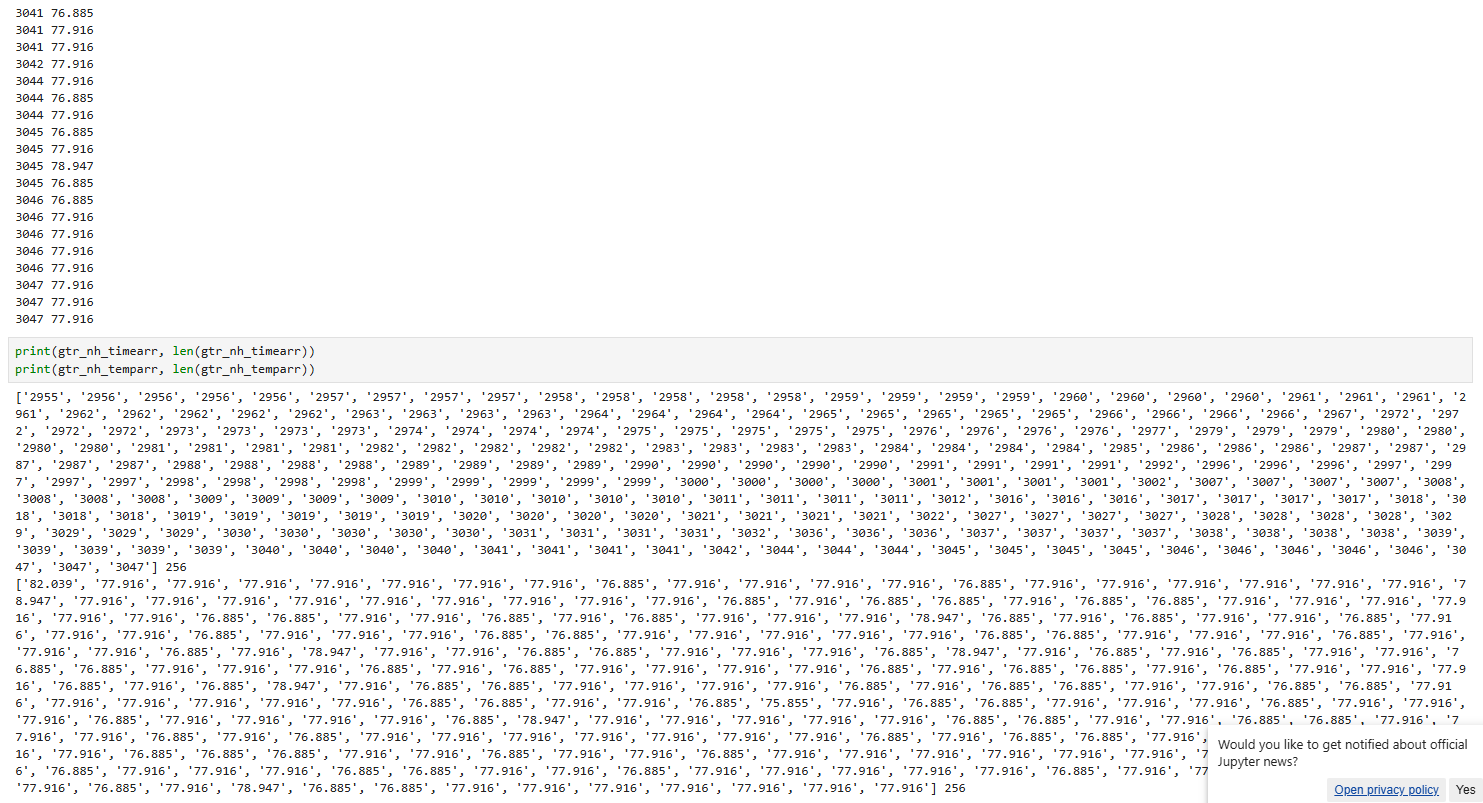
After that I create SEND_TIME_DATA and SEND_TEMP_DATA. SEND_TEMP_DATA is the same as SEND_TIME_DATA but also stores
the temperature information alongside the time. It sends each data point as a string and the notification handler receiving it parses it to get both pieces of information and puts it into a list.
SEND_TEMP_DATA is shared below along with its output. In the second photo the direct output can be seen above the code block while the print outs of the lists and their lengths (256) can be seen. SEND_TIME_DATA is the same but with less information.
Comparison of Data Transfer Methods
As mentioned earlier first method transfered 129 bytes/second. The second method uses 3150-2944 = 206 messages over 6 seconds so slightly over 34 messages a second.
The size of these messages were larger too and were 27 bytes a piece so 918 bytes a second.
As a result, the second method prints much faster. The advantage of the first is it is continuously
sending data and isn't limited by memory, however, it appears to be slower and doesn't retain memory.
The second method is faster but is limited in the amount of memory it can store and display. Given 384 kB of RAM
if the messages are in packets of 150 bytes, you can send and store 2,560 messages.
5000-Level Tasks
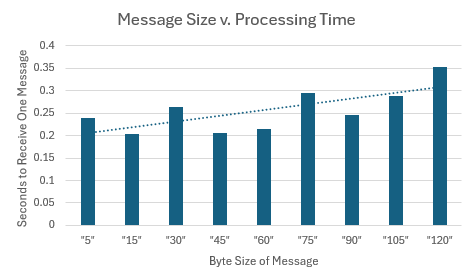
In general as you increase the byte size of the message it will take longer to process.
One can see the recorded times in the chart below and the general trend line.
The fastest time recorded was .2 and the longest time recorded was .35 so a 75% increase given
a change in message byte size of over 1000%. So larger replies generally reduce overhead
than processing a bunch of small messages. I then ran data at a higher rate and found the data gets sent in its entirety but there's a slowdown in terms of the response rate.
Discussion
I didn't have a hardware background coming into this so I learned about the sensors
on the microcontroller, I learned about baud rate, how to connect the arduino to the computer and communicate via bluetooth.
I also learned different ways to send data and compared them and evaluated their performance.
Based upon what I observed, it is more efficient for amount of data to transfer it in larger packets
but this comes at the downside of having a larger delay.